How to Adjust an Exercise Bike for Proper Posture in 2026?

Time:2026-10-24 Author:Mason
0%

Indoor cycling is no longer limited to specialist studios. The 2024 Health & Fitness Association Global Report recorded about 184 million health-club members worldwide in 2023. Many now train at home, where professional fitting support may be absent. A small saddle error can become obvious after thirty minutes. Knees may drift inward. Shoulders may tighten. Hands may numb against the handlebars.

So, how should a rider search for “How to adjust an exercise bike for the correct ergonomic posture?” The answer begins with alignment, not speed. Andy Pruitt, a respected bicycle-fit specialist and former Boulder Center for Sports Medicine director, said, “The goal of a bike fit is to make the bike fit the rider, not the rider fit the bike.” That principle remains practical for stationary bikes. The saddle should support a stable pelvis. The knee should retain a slight bend at the pedal’s lowest point. The handlebars should allow relaxed elbows and a neutral spine.

The details matter. ACSM’s 2025 Worldwide Survey of Fitness Trends ranked wearable technology as the leading trend, showing how closely people now monitor training. Yet posture feedback is still imperfect. A screen can report cadence, but it cannot always detect a collapsing hip. I have also found that a comfortable setup may feel strange initially. That does not automatically make it wrong. Recheck the position after ten minutes, then again after a longer ride. Your body changes. Your bike setup may need to change with it.
How to Adjust an Exercise Bike for Proper Posture in 2026?

Understanding Proper Posture on an Exercise Bike

How to Adjust an Exercise Bike for Proper Posture in 2026?

Understanding Proper Posture on an Exercise Bike

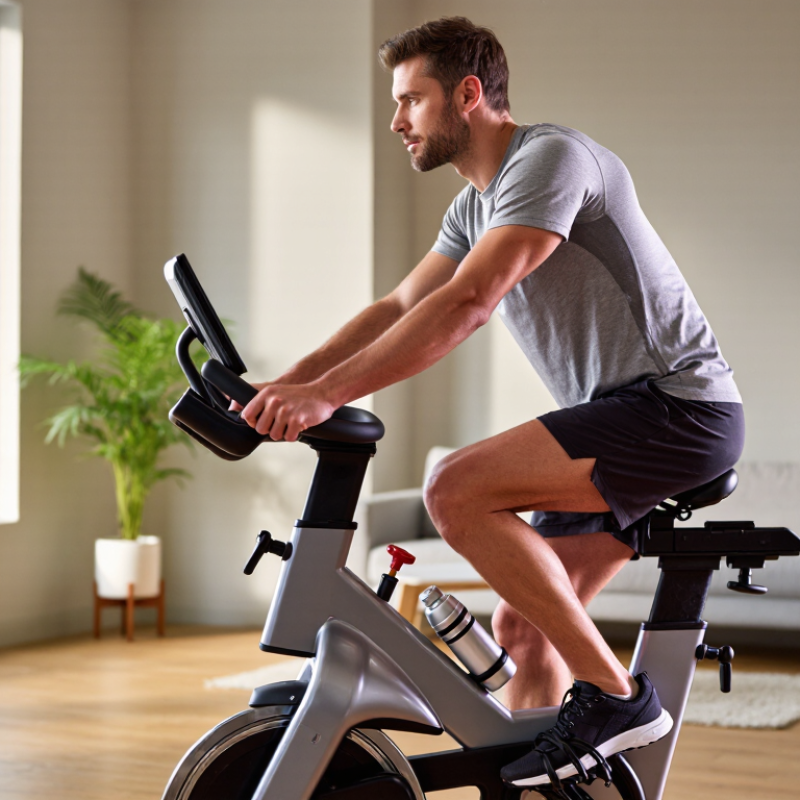
Proper posture begins with a stable, neutral position. Your head should remain relaxed, not reaching toward the console. Keep your shoulders low and your elbows slightly bent. The American College of Sports Medicine recommends regular aerobic activity, but comfort and control still matter during every session. Its 2022 guidelines support gradual progression rather than sudden increases in training load.

Set the saddle so your knee stays slightly bent at the lowest pedal point. A saddle that is too high may make your hips rock from side to side. If it is too low, your knees may feel compressed. Keep your feet level and place the pedal pressure through the middle of each foot. The World Health Organization recommends 150–300 minutes of moderate activity weekly for adults, yet poor alignment can make that target harder to maintain.

I sometimes lean too far forward when effort rises. That habit feels powerful, but it reduces control. Check your grip. Your hands should guide the body, not carry its weight. A simple test helps: you should breathe smoothly, keep your pelvis steady, and speak short sentences. Stop and adjust if numbness, sharp pain, or persistent knee discomfort appears. Small changes often matter.

Setting the Saddle Height and Fore-Aft Position

How to Adjust an Exercise Bike for Proper Posture in 2026?

Set the saddle height before changing its fore-aft position. Wear your usual training shoes and sit naturally on the bike. Place one pedal at its lowest point. Your knee should remain slightly bent, usually around 25–35 degrees. This range follows the widely cited guidance from Holmes et al. in the Clinical Journal of Sport Medicine. It also aligns with practical fitting recommendations used in cycling biomechanics research.

Do not chase a perfectly straight leg. That position can tilt your hips and strain your lower back. If your pelvis rocks, lower the saddle by 5 millimeters. If your knee feels cramped at the top, raise it slightly. Small changes matter.

A 2011 Sports Medicine review by Bini, Hume, and Croft found that saddle height changes joint angles, muscle demand, and cycling efficiency. I usually adjust in small steps, because my first estimate is rarely perfect.

After setting height, check the fore-aft position. With the crank arms horizontal, your forward knee should sit roughly above the pedal spindle. This traditional reference helps balance pressure between your hands, hips, and feet. Move the saddle forward only a few millimeters if you feel stretched. Move it backward if your knees feel crowded. Recheck after ten minutes, because posture often changes once fatigue appears. A 2022 industry survey from a professional bike-fitting association reported that repeated micro-adjustments were common during fitting sessions, not a sign of failure.

Adjusting the Handlebar Height and Reach

How to Adjust an Exercise Bike for Proper Posture in 2026?

Adjusting the Handlebar Height and Reach

Handlebar position controls your upper-body comfort and riding stability. Set the handlebars high enough to keep your spine relaxed, not rounded. Your elbows should remain slightly bent, with your shoulders away from your ears. When viewed from the side, your wrists should look neutral rather than sharply bent.

Adjust the reach gradually. Sit on the saddle with your feet secured and place your hands on the main grips. You should reach the bars without sliding forward or locking your elbows. A small bend in your elbows helps absorb movement. If your lower back feels strained, the bars may be too far away. If your shoulders tense quickly, they may be too low or too close.

Tips: Move the handlebars in small steps. Ride for three minutes after each change. Check whether your knees, hips, and shoulders feel balanced. I sometimes prefer a slightly higher position during easy rides, although that setting may reduce power during intense efforts. Comfort is useful evidence, but persistent numbness or pain deserves assessment from a qualified health professional. Do not copy another rider’s measurements blindly; body proportions and flexibility differ.

Positioning Your Feet and Aligning Your Knees

Proper foot placement begins with the ball of each foot centered over the pedal spindle. This position supports smoother force and reduces unnecessary ankle movement. Secure the straps, but keep them comfortably snug. Your toes should not feel compressed.

At the lowest pedal position, your knee should remain slightly bent, usually around 25 to 35 degrees. This range is a useful coaching guide, not a rigid rule. I check it from the side while the rider pedals slowly. The kneecap should generally track in line with the second toe. Avoid letting the knee collapse inward or drift outward. That small movement can increase stress around the joint.

Keep your hips level as the pedals rotate. If one hip rocks, the saddle may be too high, or your foot placement may be uneven. Move the seat in tiny increments, then pedal for thirty seconds before judging the change. Small adjustments matter. I once raised a saddle to solve knee pressure, but the rider’s real problem was a loose foot strap. That mistake was a useful reminder to inspect the whole position. Stop if you feel sharp pain, numbness, or persistent joint discomfort. A qualified cycling professional or physical therapist can assess movement more accurately.

Checking Your Riding Form and Making Final Adjustments

Check your riding form during an easy warm-up, not only when your body feels tired. Sit firmly on the saddle and keep your shoulders relaxed. Your spine should remain neutral, without excessive rounding or arching. Keep your knees pointing toward your toes. They should not collapse inward with each pedal stroke. Your elbows need a soft bend, while your wrists stay straight and loose.

Use a mirror or record a short side-view video. Watch whether your hips rock from side to side. That movement often suggests an unsuitable saddle height or poor reach. Your knee should remain slightly bent when the pedal reaches its lowest point. A qualified cycling professional can assess this angle more accurately. I once raised my saddle too far and felt powerful for ten minutes. Later, my lower back tightened. The change was not an improvement.

Make one adjustment at a time, then pedal for two minutes. Move the saddle in small increments instead of making dramatic changes. If your knees feel strained at the front, the saddle may sit too low or too far forward. If your hands become numb, reduce pressure by adjusting the handlebar reach and relaxing your grip. Check that both feet sit evenly on the pedals. Stop immediately if sharp pain appears. Comfort can improve slowly, and that is worth noticing.

How to Adjust an Exercise Bike for Proper Posture in 2026? - Checking Your Riding Form and Making Final Adjustments
Posture Area What to Check Recommended Form or Range Common Warning Sign Final Adjustment
Initial Bike Setup
Seat height Place the heel on the pedal at its lowest point while seated. The knee should be almost straight with the heel on the pedal. With the ball of the foot on the pedal, the knee should retain a slight bend of approximately 25–35 degrees at the bottom of the stroke. Hips rock from side to side, the knee locks out, or the toes point excessively downward. Raise the seat if the hips rock or the knee feels crowded. Lower it if the knee locks out or the pelvis shifts during each revolution.
Seat fore-aft position Check the knee position when the crank arms are horizontal. The front of the forward knee should be roughly aligned over the pedal spindle or slightly behind it, without forcing the knee far ahead of the toes. Pressure at the front of the knee, reaching for the pedals, or feeling pushed too far forward. Move the saddle backward if the knees feel compressed. Move it forward slightly if the legs feel overstretched, while keeping the seat height correct.
Handlebar height Observe the spine, shoulders, and neck while holding the normal riding position. The back should remain long and controlled, the shoulders relaxed, and the neck aligned with the spine. Beginners or riders with limited flexibility often benefit from a higher handlebar position. Rounded lower back, shrugged shoulders, neck strain, or excessive weight on the hands. Raise the handlebars or reduce the reach. Lower them only when the rider can maintain a neutral spine without discomfort.
Handlebar reach Check whether the elbows can remain softly bent while the hands rest on the bars. Arms should be relaxed with a small bend at the elbows. The rider should not need to slide forward on the saddle or lock the elbows. Locked elbows, tense shoulders, numb hands, or excessive leaning toward the handlebars. Shorten the reach or bring the handlebars closer if possible. Reposition the saddle only after confirming the seat height.
Riding Form Check
Head and neck Look ahead rather than constantly bending the head toward the console or floor. Keep the ears generally aligned over the shoulders and maintain a neutral gaze. The chin should not be forced toward the chest. Neck stiffness, headache, or a continuously downward-facing head position. Raise the display or handlebars if available, relax the shoulders, and keep the gaze forward for most of the session.
Shoulders and upper back Watch for shoulder elevation and tension during moderate effort. Shoulders should stay away from the ears, with the upper back stable and the chest comfortably open. Shoulders remain shrugged, elbows flare outward, or the rider supports too much body weight through the hands. Lighten the grip, bend the elbows slightly, and raise the handlebars if a neutral upper-body position cannot be maintained.
Spine and pelvis Check the side view and confirm that the pelvis remains stable on the saddle. Maintain a neutral or comfortably extended spine without collapsing through the lower back. The pelvis should stay level rather than tipping or rocking. Lower-back rounding, excessive arching, pelvic rocking, or pain that increases as resistance rises. Reduce the reach, adjust seat height in small increments, and lower the resistance temporarily while rebuilding control.
Knee tracking View the knees from the front during steady pedaling. Knees should generally track in line with the feet and move smoothly without repeatedly collapsing inward or pushing far outward. Repeated knee wobble, sharp pain, or a knee moving noticeably out of line with the foot. Check foot position, saddle height, and stance width. Stop and seek professional assessment for persistent or sharp pain.
Foot and ankle position Place the ball of each foot over the pedal spindle and observe ankle movement. Keep the feet secure and the ankles relatively stable. A small natural ankle movement is acceptable; excessive toe-pointing is not. Numb toes, foot slipping, excessive heel drop, or repeated ankle twisting. Adjust footwear or straps, center the foot over the pedal, and recheck seat height before changing pedaling technique.
Pedaling motion Listen and feel for a smooth, controlled cadence at a comfortable resistance. Pedal smoothly without bouncing on the saddle. A moderate cadence should allow the rider to maintain form and speak in short sentences during an easy-to-moderate session. Hips bounce, cadence becomes choppy, or the rider must pull hard on the handlebars to maintain speed. Lower resistance or cadence, stabilize the trunk, and adjust the saddle if bouncing continues at an otherwise comfortable effort.
Final Adjustment and Safety Review
Hand pressure Periodically lift or loosen the grip briefly without losing balance. Hands should guide the body rather than carry most of its weight. Grip the bars lightly and keep wrists in a mostly neutral position. Persistent hand numbness, wrist pain, or pale or tingling fingers. Relax the grip, vary hand positions, check handlebar reach, and consider padded gloves if appropriate.
Breathing and effort Confirm that breathing remains controlled during the posture check. For easy-to-moderate riding, the rider should be able to speak in short phrases. Posture should not deteriorate as soon as resistance increases. Breath holding, uncontrolled breathing, dizziness, chest discomfort, or sudden weakness. Reduce intensity and stop if symptoms are severe, sudden, or do not resolve promptly. Seek medical help for urgent symptoms.
Comfort after 5–10 minutes Recheck the body after warming up because the initial position may feel different once movement begins. No sharp pain, progressive numbness, joint pressure, or need to shift repeatedly on the saddle. Discomfort increases steadily, or the rider repeatedly changes position to avoid pressure. Make only one small adjustment at a time, ride for several minutes, and record the setting that feels stable and comfortable.
Adjustment status Use the final ride to classify the setup before increasing duration or resistance. Ready Stable pelvis, relaxed shoulders, aligned knees, smooth pedaling, and no worsening discomfort. Adjust Mild form breakdown or recurring pressure that improves when intensity is reduced. Stop Sharp pain, significant numbness, dizziness, chest discomfort, or symptoms that persist after stopping.
Practical rule: Make one adjustment at a time, change the position in small increments, and pedal for several minutes before judging the result. Proper setup should support smooth movement without sharp pain or progressive numbness.

FAQS

What does proper posture look like on an exercise bike?

Keep your head relaxed and your shoulders low. Slightly bend your elbows. Keep your spine neutral and your pelvis steady. Small changes help.

How high should the saddle be?

Set it while wearing your usual training shoes. At the lowest pedal point, your knee should stay slightly bent. A bend of about 25–35 degrees is commonly used. Avoid a fully straight leg.

What happens if the saddle is too high?

Your hips may rock from side to side. Your lower back may also feel strained. Lower the saddle by about 5 millimeters, then ride briefly and reassess.

What happens if the saddle is too low?

Your knees may feel compressed at the top of each pedal stroke. Raise the saddle slightly. Do not make a large change at once.

How should I set the saddle forward or backward?

With the crank arms horizontal, keep your forward knee roughly above the pedal spindle. Move the saddle only a few millimeters. Recheck after ten minutes, because fatigue can change your posture.

How high should the handlebars be?

Set them high enough to keep your spine relaxed. Your shoulders should stay away from your ears. A higher position may feel better during easy rides, though it can reduce power during hard efforts.

How can I tell if the handlebars are too far away?

Strained lower-back muscles may indicate excessive reach. You should touch the grips without sliding forward or locking your elbows. Move the handlebars closer in small steps.

What should my feet and hands do during pedaling?

Keep your feet level and press through the middle of each foot. Your hands should guide your body, not carry its weight. Maintain a relaxed grip.

When should I stop and adjust the bike?

Stop if you notice numbness, sharp pain, or continuing knee discomfort. Also adjust if your breathing becomes difficult or your pelvis moves noticeably. Comfort is useful evidence, but it is not a complete diagnosis.

How often should I recheck my posture?

Recheck after several minutes, especially when effort increases. I sometimes lean forward too much when tired. That feels powerful, but it reduces control. My first adjustment is rarely perfect.

Conclusion

How to adjust an exercise bike for the correct ergonomic posture? Start by setting the saddle so your knee remains slightly bent when the pedal is at its lowest point. The saddle should also be positioned forward or backward so your knees stay comfortably aligned with the pedal axle, without forcing you to reach or curl your hips. A properly adjusted saddle supports smooth movement and reduces unnecessary pressure on the knees and lower back.

Next, set the handlebars high enough to keep your spine neutral and your shoulders relaxed. Your reach should allow a soft bend in the elbows rather than locked arms or rounded shoulders. Place the middle of each foot over the pedal, keep the ankles stable, and ensure the knees track in line with the toes. During a final check, ride slowly and observe your posture, breathing, and joint comfort. Make small adjustments until your movement feels balanced, controlled, and sustainable.

Mason

Mason

Mason is a seasoned marketing professional with a deep expertise in the company's offerings and a passion for driving brand awareness. With a strong background in digital marketing strategies, he has an innate ability to connect with diverse audiences and effectively communicate product benefits.......